


Background
These activities are designed to demonstrate radiation heat transfer while also looking at some common building related examples. Caution: the heat lamps used in this activity will become very hot and can cause injury or burn flammable material. Students should use safety glasses and keep a safe distance from the lamp.
Materials
- Lab stands (4 total)
- Clamps and clamp holders (as needed to hold plate, thermometers and lamp)
- Heat lamp with clamp on fixture (1 total)
- Thermometers or electronic temperature sensors with displays (2 total)
- Metal plates (approximately 12" by 12", painted gray or black) (1 minimum)
- Metal plate same as above with one side painted white (optional) (1 total)
Part 1 - Metal Plate Only
[The setup and procedure for Part 1 is the same as Part 1 of the Conduction Activities where only the plate is used, so if available, Conduction Activity Part 1 data can be used here].
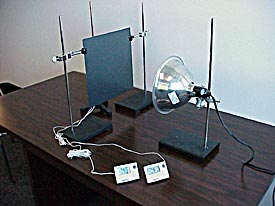
- Set up
test stands as shown in Figure 1, starting with the plain metal plate
and heat lamp approximately 12" from the plate.
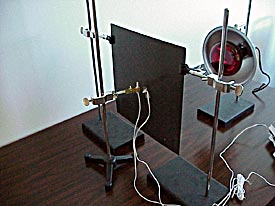
- Place
one temperature sensor or thermometer so there is a ½" to
¾" airspace behind the plate, and tape another sensor to
the center of the back of the plate, as shown in Figure 2.
- Allow
at least 5 minutes after setting the experiment up before turning on
the heat lamp and taking any measurements to allow the plate and sensors
to reach ambient temperature.
- Take one plate and one air measurement with the lamp off, then turn the lamp on and take additional plate and air temperature measurements every minute for 5 minutes.
 |
 |
Figure
1: Example of radiation activity Part 1 setup. |
Figure
2: Close-up of temperature sensors, one taped to plate and the other
½" to ¾" behind it. |
Part 2 - Radiant Barrier Facing the Lamp
Then being careful because the plate may be hot, switch out the plate with an identical plate with a radiant barrier or aluminum foil on one side (or after it cools tape a sheet of radiant barrier to the same plate you used in Part 1), setting up the plate so that the radiant barrier is facing the lamp, and the sensor is facing away from the lamp (attached to the metal plate, on the back side of the plate). After again waiting at least 5 minutes so the plate is close to ambient temperature, take plate and air temperature measurements with the lamp off, then turn on the lamp and take 5 additional plate and air temperature measurements, one every minute.
Part 3 - Radiant Barrier Facing Away from Lamp
Turn the same plate around (also moving the sensor taped to the plate to the center of the other side of the plate so the sensor is again facing away from the lamp) so the radiant barrier is facing away from the lamp, as shown in Figure 3, and repeat the experiment. After again allowing time for the plate and sensors to cool, take plate and air temperature measurements with the lamp off, then turn on the lamp and take 5 additional plate and air temperature measurements, one every minute. |
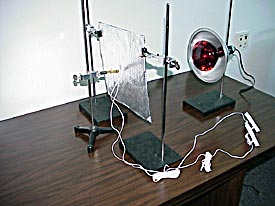 |
| Figure 3: Example of Part 3 radiation activity setup with radiant barrier facing away from lamp and one sensor taped to the radiant barrier and the other 1/2" to 3/4" behind it. |
Part 4 - White Reflective Surfaces (optional)
Replace the plate with an identical plate that has one of the surfaces painted white. With the white side of the plate facing the lamp, repeat the experiment again taking a total of 6 measurements.
Data Analysis and Discussion
Plot the data together as a class or as an assignment and discuss. The plots below show example results from the above experiments (note that the plots also include results for bubble wrap from the conduction experiments). Figure 4 shows temperatures taken by the sensor taped to the back of the plates while Figure 5 shows air temperatures measured approximately ¾" behind the plates.
Observations include:
The plain metal plate has the highest rate of temperature increase and highest end temperatures for both the plate and air temperature measurements
The plate temperature of the radiant barrier facing back away from the lamp ends up much higher than the plate temperature of the radiant barrier facing the lamp. This result is because the radiant barrier facing the lamp reflects radiation back to the lamp keeping the plate surface cool (so there is little conduction through the plate), while in the case where the radiant barrier faces away from the lamp the plate is heated by the lamp and the heat conducts through the plate to the radiant barrier and then to the temperature sensor taped to it.
The air temperatures behind the plates for both the radiant barrier facing the lamp and the radiant barrier facing away from the lamp are very similar. This result may be a surprise since the plate temperature of the radiant barrier facing away from the lamp is much higher than the case where the radiant barrier faces the lamp, but a radiant barrier reflects radiated heat and also is a poor radiation emitter even when the material itself heats up, so again little heat is re-radiated or emitted to the temperature sensor ¾" behind the plate.
Also compare radiant barrier results with the white painted and bubble
wrap plates
(if done and if not already discussed during another activity).
- Did the
radiant barrier keep the plate or air temperatures lower than the bubble
wrap did?
- If
so, what could you do to improve the performance of the bubble wrap
did?
- If
so, what could you do to improve the performance of the bubble wrap
did?
- What would happen if you sandwiched a piece of radiant barrier between the plate and bubble wrap?
Figure
4: Example of back of plate temperature measurements.
Figure
5: Example of behind plate air temperature measurements.
National Science Standards | Glossary | References | Site Map | Feedback Form
Individual pages from this web site may be printed
and duplicated for
student classroom use
provided that proper credit is given to
the Florida Solar
Energy Center (FSEC).
© 2007-2014 University of Central Florida. The Florida Solar Energy Center (FSEC)
is a research institute of the
University of Central Florida.
For more information about FSEC, please contact us or learn more about us.
Find us on Facebook!